https://flutter.io/docs/development/ui/layout
Flutter布局机制的核心是小部件(widget)。在Flutter中,几乎所有东西都是小部件 - 甚至布局模型都是小部件。您在Flutter应用程序中看到的图像,图标和文本都是小部件。但是您看不到的东西也是小部件,例如排列,约束和对齐可见小部件的行,列和网格。
您可以通过组合widget来构建更复杂的widget来创建布局。例如,下面的第一个屏幕截图显示了3个图标,每个图标下面都有一个标签:


第二个屏幕截图显示了可视布局,显示了一列3列,其中每列包含一个图标和一个标签。
注意:本教程中的大多数屏幕截图都显示为debugPaintSizeEnabled设置为true,因此您可以看到可视布局。
有关更多信息,请参阅可视调试: Visual debugging,,调试Flutter应用程序中的一节。
以下是此UI的窗口小部件树图:

大多数情况应该如您所料,但你可能对Container(粉色部分)更感兴趣。
Container是一个窗口小部件类,允许您自定义其子窗口小部件。如果要添加padding,margins,borders或 background color,请使用Container来命名其某些功能。
在此示例中,每个Text小部件都放在Container中以添加边距。整个Row也放在一个Container中,以便在行周围添加填充。
此示例中的其余UI由属性控制。使用其颜色属性设置图标的颜色。使用Text.style属性设置字体,颜色,权重(weight)等。列和行具有允许您指定子项垂直或水平对齐方式的属性,以及子项应占用的空间大小。
如何在Flutter中布局单个小部件?本节介绍如何创建和显示简单小部件。它还显示了一个简单的Hello World应用程序的完整代码。
在Flutter中,只需几步即可在屏幕上显示文本,图标或图像。
根据您想要对齐(align)或约束(constrain)可见widget的方式,从各种Layout Widget中进行选择,因为这些不同类型的layout widget的特征通常会传递给容器组件(the contained widget)。
此示例使用Center将其内容水平和垂直居中。
例如,创建Text Widget:
创建Image widget:
Image.asset(
  'images/lake.jpg',
  fit: BoxFit.cover,
),
创建Icon widget:
Icon(
  Icons.star,
  color: Colors.red[500],
),
All layout widgets have either of the following:
- A
child property if they take a single child – for example, Center or Container
- A
children property if they take a list of widgets – for example, Row, Column, ListView, or Stack.
往Center widget添加Text widget。
Center(
  child: Text('Hello World'),
),
Flutter应用程序本身就是一个小部件,大多数小部件都有一个build()方法。通过在应用程序的build()方法中实例化并返回小部件,实现显示小部件。
Material apps
对于Material应用程序,您可以使用Scaffold小部件;它提供默认banner,背景颜色,并具有用于添加drawers, snack bars和底部sheets的API。
然后,您可以将Center小部件直接添加到主页的body属性中。随后,您可以将Center小部件直接添加到主页的body属性中。
class MyApp extends StatelessWidget {
  @override
  Widget build(BuildContext context) {
    return MaterialApp(
      title: 'Flutter layout demo',
      home: Scaffold(
        appBar: AppBar(
          title: Text('Flutter layout demo'),
        ),
        body: Center(
          child: Text('Hello World'),
        ),
      ),
    );
  }
}
Dart2后我们可以在创建对象的时候省略new和const.
注意:Material库实现遵循Material Design原则的小部件。
在设计UI时,您可以专门使用标准widget库中的小部件,也可以使用 Material库中的窗口小部件。
您可以混合来自两个库的小部件,可以自定义现有小部件,也可以构建自己的一组自定义小部件。
Non-Material apps
对于非Material应用程序,您可以将Center小部件添加到应用程序的build()方法:
class MyApp extends StatelessWidget {
  @override
  Widget build(BuildContext context) {
    return Container(
      decoration: BoxDecoration(color: Colors.white),
      child: Center(
        child: Text(
          'Hello World',
          textDirection: TextDirection.ltr,
          style: TextStyle(
            fontSize: 32,
            color: Colors.black87,
          ),
        ),
      ),
    );
  }
}
默认情况下,非Material应用程序不包含AppBar,标题或背景颜色。如果您希望在非Material应用程序中使用这些功能,则必须自己构建它们。

最常见的布局模式之一是垂直或水平排列小部件。您可以使用Row widget水平排列窗口小部件,使用Column widget垂直排列widgets。
What's the point?
行和列是两种最常用的布局模式。
行和列每个都有一个子窗口小部件列表。
子窗口小部件本身可以是行,列或其他复杂窗口小部件。
您可以指定行或列如何在垂直和水平方向上对齐其子项。
您可以拉伸或约束特定的子窗口小部件。
您可以指定子窗口小部件如何使用Row或Column的可用空间。
要在Flutter中创建行或列,可以将widget列表添加到“行”或“列”widget中。反过来,每个子元素本身可以是一行或一列,依此类推。以下示例显示了如何在行或列中嵌套行或列。
此布局组织为一行。该行包含两个子项:左侧的列和右侧的图像:

左列的小部件树嵌套行和列:

You’ll implement some of Pavlova’s layout code in Nesting rows and columns.
注意:行和列是水平和垂直布局的基本原始窗口小部件 - 这些低级窗口小部件允许最大程度的自定义。
Flutter还提供专门的,更高级别的小部件,可能足以满足您的需求。
例如,您可能更喜欢ListTile,这是一个易于使用的小部件,具有前导和尾随图标的属性,以及最多3行文本。
您可能更喜欢ListView,而不是ListView,这是一种类似于列的布局,如果其内容太长而无法容纳可用空间,则会自动滚动。
有关更多信息,请参阅常见布局小部件。
您可以使用mainAxisAlignment和crossAxisAlignment属性控制行或列如何对齐其子项。
For a row, the main axis runs horizontally and the cross axis runs vertically. For a column, the main axis runs vertically and the cross axis runs horizontally.

MainAxisAlignment和CrossAxisAlignment类提供了各种用于控制对齐的常量。
注意:向项目添加图像时,需要更新pubspec文件以访问它们 - 此示例使用Image.asset显示图像。
有关更多信息,请参阅此示例的pubspec.yaml文件,或在Flutter中添加资产和图像。
如果您使用Image.network引用在线图像,则无需执行此操作。
flutter:
  assets:
  #对应根目录下的assets文件夹下所有文件
    - assets/
在以下示例中,3个图像中的每一个是100像素宽。
渲染框(render box)(在这种情况下,整个屏幕)宽度超过300像素,因此将主轴对齐设置为空间在每个图像之间,之前和之后均匀地划分自由水平空间。(ps:均匀分布)

Row(
  mainAxisAlignment: MainAxisAlignment.spaceEvenly,
  children: [
    Image.asset('images/pic1.jpg'),
    Image.asset('images/pic2.jpg'),
    Image.asset('images/pic3.jpg'),
  ],
);
列的工作方式与行的工作方式相同。以下示例显示了包含3个图像的列,每个图像的高度为100像素。
渲染框的高度(在这种情况下,整个屏幕)超过300像素,因此将主轴对齐设置为spaceEvenly在每个图像之间,上方和下方均匀地划分自由垂直空间。
Column(
  mainAxisAlignment: MainAxisAlignment.spaceEvenly,
  children: [
    Image.asset('images/pic1.jpg'),
    Image.asset('images/pic2.jpg'),
    Image.asset('images/pic3.jpg'),
  ],
);

当布局太大而无法容纳设备时,受影响的边缘会出现黄色和黑色条纹图案。
这是一个太宽的行的示例:

可以使用“扩展”窗口小部件调整窗口小部件的大小以适合行或列。
要修复前一个示例,其中图像行对于其渲染框来说太宽,请使用Expanded小部件包装每个图像。
Row(
  crossAxisAlignment: CrossAxisAlignment.center,
  children: [
    Expanded(
      child: Image.asset('images/pic1.jpg'),
    ),
    Expanded(
      child: Image.asset('images/pic2.jpg'),
    ),
    Expanded(
      child: Image.asset('images/pic3.jpg'),
    ),
  ],
);

使用flex调整表比例,默认是1:
Row(
  crossAxisAlignment: CrossAxisAlignment.center,
  children: [
    Expanded(
      child: Image.asset('images/pic1.jpg'),
    ),
    Expanded(
      flex: 2,
      child: Image.asset('images/pic2.jpg'),
    ),
    Expanded(
      child: Image.asset('images/pic3.jpg'),
    ),
  ],
);

默认情况下,行或列沿其主轴占用尽可能多的空间,但如果要将子项紧密组合在一起,请将其mainAxisSize设置为MainAxisSize.min。以下示例使用此属性将星形图标打包在一起。
Row(
  mainAxisSize: MainAxisSize.min,
  children: [
    Icon(Icons.star, color: Colors.green[500]),
    Icon(Icons.star, color: Colors.green[500]),
    Icon(Icons.star, color: Colors.green[500]),
    Icon(Icons.star, color: Colors.black),
    Icon(Icons.star, color: Colors.black),
  ],
)

Nesting rows and columns 嵌套
布局框架允许您根据需要在行和列内嵌套行和列。让我们看看以下布局的概述部分的代码:

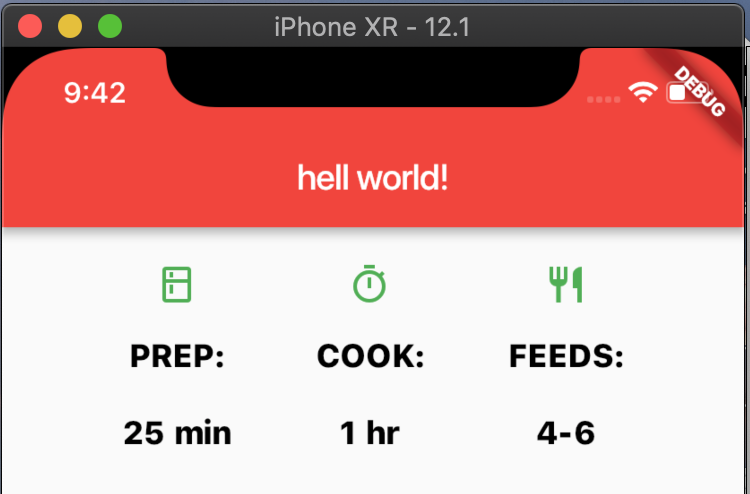
概述的部分实现为两行。评级行包含五颗星和评论数。图标行包含三列图标和文本。

The ratings variable creates a row containing a smaller row of 5 star icons, and text:
final iconList = DefaultTextStyle.merge(
style: TextStyle(
color: Colors.black,
fontWeight: FontWeight.w800,
fontFamily: 'Roboto',
letterSpacing: 0.5,
fontSize: 18,
height: 2,
),
child: Container(
padding: EdgeInsets.all(20),
child: Row(
mainAxisAlignment: MainAxisAlignment.spaceEvenly,
children: [
Column(
children: [
Icon(Icons.kitchen, color: Colors.green[500]),
Text('PREP:'),
Text('25 min'),
],
),
Column(
children: [
Icon(Icons.timer, color: Colors.green[500]),
Text('COOK:'),
Text('1 hr'),
],
),
Column(
children: [
Icon(Icons.restaurant, color: Colors.green[500]),
Text('FEEDS:'),
Text('4-6'),
],
),
],
),
),
);
@override
Widget build(BuildContext context) {
return MaterialApp(
title: 'flutter app1',
theme: ThemeData(primarySwatch: Colors.red),
home: new Scaffold(
appBar: AppBar(
title: Text('hell world!'),
),
body: iconList));
}

The leftColumn variable contains the ratings and icons rows, as well as the title and text that describes the Pavlova:
final leftColumn = Container(
  padding: EdgeInsets.fromLTRB(20, 30, 20, 20),
  child: Column(
    children: [
      titleText,
      subTitle,
      ratings,
      iconList,
    ],
  ),
);
The left column is placed in a Container to constrain its width. Finally, the UI is constructed with the entire row (containing the left column and the image) inside a Card.
The Pavlova image is from Pixabay. You can embed an image from the net using Image.network() but, for this example, the image is saved to an images directory in the project, added to the pubspec file, and accessed using Images.asset(). For more information, see Adding assets and images.
body: Center(
  child: Container(
    margin: EdgeInsets.fromLTRB(0, 40, 0, 30),
    height: 600,
    child: Card(
      child: Row(
        crossAxisAlignment: CrossAxisAlignment.start,
        children: [
          Container(
            width: 440,
            child: leftColumn,
          ),
          mainImage,
        ],
      ),
    ),
  ),
),
提示:Pavlova示例在宽屏设备(例如平板电脑)上水平运行最佳。如果您在iOS模拟器中运行此示例,则可以使用硬件>设备菜单选择其他设备。对于此示例,我们建议使用iPad Pro。您可以使用硬件>旋转将其方向更改为横向模式。您还可以使用“窗口”>“缩放”更改模拟器窗口的大小(不更改逻辑像素数)。
Flutter拥有丰富的布局小部件库。以下是一些最常用的。目的是让您尽快启动并运行,而不是用完整的列表压倒您。有关其他可用窗口小部件的信息,请参阅小部件目录,或使用API参考文档中的“搜索”框。
此外,API文档中的窗口小部件页面通常会提供有关可能更适合您需求的类似窗口小部件的建议。
以下小部件分为两类:来自小部件库的标准小部件和来自Material library的专用小部件。任何应用都可以使用小部件库,但只有Material应用可以使用Material Components库。
- Container: Adds padding, margins, borders, background color, or other decorations to a widget.
- GridView: Lays widgets out as a scrollable grid.
- ListView: Lays widgets out as a scrollable list.
- Stack: Overlaps a widget on top of another.
- Card: Organizes related info into a box with rounded corners and a drop shadow.
- ListTile: Organizes up to 3 lines of text, and optional leading and trailing icons, into a row.
Container
许多布局都允许自由使用Container来设置widget之间的padding、borders、margins。您可以通过将整个布局放入Container并更改其背景颜色或图像来更改设备的背景。
Summary (Container)
- 添加padding、borders、margins
- 修改背景颜色或图片
- 包含单个子widget,但该子窗口可以是Row,Column,甚至是widget tree的根
Examples (Container)
布局包块两行,每行包括2个图片.Container将整个容器的变为浅灰色。
Widget _buildImageColumn() => Container(
      decoration: BoxDecoration(
        color: Colors.black26,
      ),
      child: Column(
        children: [
          _buildImageRow(1),
          _buildImageRow(3),
        ],
      ),
    );
A Container is also used to add a rounded border and margins to each image:
Widget _buildDecoratedImage(int imageIndex) => Expanded(
      child: Container(
        decoration: BoxDecoration(
          border: Border.all(width: 10, color: Colors.black38),
          borderRadius: const BorderRadius.all(const Radius.circular(8)),
        ),
        margin: const EdgeInsets.all(4),
        child: Image.asset('images/pic$imageIndex.jpg'),
      ),
    );

Widget _buildImageRow(int imageIndex) => Row(
      children: [
        _buildDecoratedImage(imageIndex),
        _buildDecoratedImage(imageIndex + 1),
      ],
    );
You can find more Container examples in the tutorial and the Flutter Gallery.
GridView
使用GridView将窗口小部件作为二维列表放置。 GridView提供了两个预制列表,或者您可以构建自己的自定义网格。当GridView检测到其内容太长而无法容纳渲染框时,它会自动滚动。
Summary (GridView)
- 将widgets放到grid中
- 检测列内容(column content)何时超出渲染框并自动提供滚动
- 构建自己的自定义网格,或使用提供的网格之一:
- GridView.count允许您指定列数
- GridView.extent允许您指定图块的最大像素宽度
Note: When displaying a two-dimensional list where it’s important which row and column a cell occupies (for example, it’s the entry in the “calorie” column for the “avocado” row), use Table or DataTable.
示例: https://github.com/flutter/website/blob/master/examples/layout/grid_and_list/lib/main.dart
import 'package:flutter/material.dart';
void main() => runApp(MyApp());
class MyApp extends StatelessWidget {
@override
Widget build(BuildContext context) {
return MaterialApp(
title: "flutter layout grid",
home: Scaffold(
appBar: AppBar(
title: Text('flutter demo'),
),
body: Center(
child: _buildGrid(),
),
),
);
}
Widget _buildGrid() {
return GridView.extent(
maxCrossAxisExtent: 100,
padding: const EdgeInsets.all(5),
mainAxisSpacing: 14,
crossAxisSpacing: 14,
children: _buildGridTileList(30),
);
}
List<Container> _buildGridTileList(int count) {
return List.generate(count, (i) => Container(child: Image.asset('images/pic$i.jpg'),));
}
}